Several months ago I found an article in This Old House on how to build your own cold frame. I remember reading this and thinking, one day, I would like to have one of those for myself! So this year, I stumbled across some old windows - which were removed from an old farm house to be replaced with more efficient windows - so I snagged them! I brought them home, cleaned them up, and knew, right away, they were going to be used to build a cold frame!
In the high desert, it's not unusual for the daytime high to reach 80 degrees but the nights can still creep to the upper 20's or lower 30's...below freezing anyway you look at it! Since I grew up in Oregon's valley - where the temperature is fairly mild - I often forget the exteremes in termperature over here!
I have been trying to change my thought process and learn how to garden in the high-desert area; sometimes I really feel like I have the jist of it down, but as soon as someting out-of-the-ordinary happens, I can easily place my hands in the air and surreneder to the fact I can't do much (at least to my perfectionistic standards at times :-).
But I digerss...the topic at hand is about cold frames. Esentially, my experiences with high desert climates are very useful when thinking about building - or even using - a cold frame.
Cold frames are quite simple when you break it down (but they can be very nice and more expensive...if you want the best!) Esentially, its an area with a transparent covering to protect plants and seedlings from cold temperatures. Oftentimes they are built against an existing wall (like that of a house, garage, barn, etc.) and then covered with anything semi-translucent (ie. plastic, old windows, glass, etc.). It creates an environment similiar to a green house, but aren't as well insulated so the plants inside are more to susceptable to extreme cold and heat. Here, I have found it to be extrememly beneficial in late spring - when the days are up in the 70's but the nights still get into the low to mid 30's.
Only having mine for a few weeks hardly makes me an expert, but I am sold on them and am going to contiue to make use of it!! Here is what I did...
While contemplating the placement of my cold frame, I was made acutely aware if my limited space. At the moment, while we are doing our best to get some property, we have a meager standard suburban lot. It's not much, but with strategic and careful placement, we have been able to do a lot with it! So the basic design of this bed is out or necessity and usefulness.
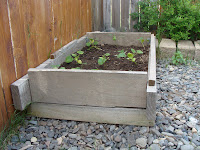
I simply started out by using some scrap wood we had around the house to make a raised bed. It's approximately a 5'x3'x1 1/2' (the longer front and back boards are simply for asthetics...I thought it would look cool:-).
I placed the frame in an area that got quite a bit of sun - about 7hrs. - and filled it with a mixture of some of my well-composted garden soil, standard top-soil from the local nursery, and one tray of my worm compost...worms and all!
After filling it, I took a chance and transplanted my squash - Sweet Meat, Hubbard, and Delicata - I started from seed a month ago. Since the weather has been very mild the squash had two days - and nights - to harden before placing them in the bed.
Next, I simply took two glass windows and covered the eitire opening to the bed. There was a small seam in the middle, and beacuse of the structure of my bed (the ends are taller than the length...me and my uniqueness;-) a small opening at either end. So it was not by any-means "sealed".
During the first day in the bed, I had the windows slid off to the side so not to bake or sunburn my young squash.
In the early evening, about 7 pm, as the sun was starting its descent, I placed the windows over the top in hopes of retainging as much heat a possible...and let them be.
Last night was my test night...it got down to about 34 degrees (which I think is far too cold for May 18th :-).
When I awoke this morning at 6 am., the frist thing I tought of were my squash in the cold frame! Hahaha, that sounds terrible but it's absolutely the truth. I went out and removed the windows and to my pleasant surpirse, they were perky and green...just as I had left them the night before! I was successful...horrah!!
Since my cold frame is so simplisitc, I wouldn't trust it in late winter or early spring. My gut feeling is that it's not well insulated enough to protect seedlings unless they are of a cold-hardy crop: broccoli, cauliflower, cabbage, peas, brussel sprouts, etc. But, being May 18 and 34 degrees at night, my plants faired very well!
So, if you have the room, time, materials, and need for a cold frame...build yourself one! Not only can you take credit for your truly one-of-a-kind design (like mine!) but you may even be able to brag about how early you were able to plant out your cops and how well they are thriving!
Whatever you decide for your garden, have fun with it! It's all part of the experience!


No comments:
Post a Comment